家庭网络PXE启动全攻略 🔗
PXE全称为预启动执行环境(Preboot eXecution Environment,也被称为预执行环境)提供了一种使用网络接口(Network Interface)启动计算机的机制。 这种机制让计算机的启动可以不依赖本地数据存储设备(如硬盘)或本地已安装的操作系统。 使用PXE,可以无盘启动系统,网吧中一般都是用基于PXE的无盘系统方案。那么在家庭网络中,PXE能做些什么?
- 启动winpe
- 启动Live Linux系统
- 启动ISO文件
- 无盘启动完整的Linux系统
PXE启动是一种高效且优雅的替换“刻录U盘并启动维护”的方式,免去反复刻录U盘,也不会受限于U盘缓慢的读写。
太长不看版:请直接转最后一部分查看使用openwrt路由器与一个DHCP服务器简易配置PXE服务。
PXE启动过程与相关资料 🔗
启动过程(以pxelinux,Bios模式为例):
- 启动进入网卡的PXE固件,开始进行Bootp协议广播DHCP请求
- 获取IP地址,以及tftp服务器地址与NBP文件路径(<tftp IP>, pxelinux.0)
- 固件下载并加载NBP(Network Bootstrap Program),并将控制权转移。
- NBP继续从tfpt服务器下载配置文件,显示启动菜单。(pxelinux.cfg\default)
- NBP按照配置下载操作系统内核,并完整自举。(vmlinux,initrd.img)
常见的NBP有两种:pxelinux,iPXE。两者的可定制性都很好。
pxelinux项目比较古老,由isolinux衍生,不同的功能模块分散到各个com文件中,使用和部署都很麻烦。如加载内核的Linux由linux.c32和ldlinux.c32提供,但是加载COM文件
需要先加载libcom32.c32与libutil.c32。
Debian和Ubuntu的netboot方式的安装器使用pxelinux,
想要使用pxelinux可以下载,并参照pxelinux的文档查看,不难理解。
实际使用中令我放弃pxelinux的原因是dnsmasq不能自定义DHCP Option 210 pxelinux.pathprefix,导致我没办法将Bios模式与UEFI模式两种启动模式进行区分,最终职能兼容一种启动模式的客户端。
iPXE则不仅是一个NBP,iPXE也支持刷写网卡的固件。因而iPXE将所有功能集中到一个文件,并且流程控制就像写shell脚本一样,十分方便。所以最终我们选用iPXE作为NBP。 并且,iPXE还支持http,https,ftp,slam,nfs等传输协议,也支持IPv6与VLAN等网络协议。
一些相关资料:
- Installing Debian using network booting
- GParted Live on PXE Server
- pxelinux
- iPXE Documentation
- wimboot
- Extensive iPXE menu example
- Breaking the loop with the iPXE
PXE设置实例 🔗
为了跟随教程部署一个完整的PXE启动服务,你需要在网络中能
- 设置DHCP服务器
- 部署一个tftp服务器
- 部署一个http服务器
- (可选)部署一个nfs服务器
- (可选,进阶)部署一个iSCSI服务器
设置DHCP服务器 🔗
我这里使用openwrt的路由器,所以直接修改路由器的配置文件即可。其他DHCP服务器可以参考前文的链接。
编辑/etc/dnsmasq.conf
#/etc/dnsmasq.conf

#检查客户端启动模式,设置不同tag
dhcp-match=set:efi-x86_64,option:client-arch,7
dhcp-match=set:efi-x86_64,option:client-arch,9
dhcp-match=set:bios,option:client-arch,0
#区别对待来自iPXE的dhcp请求,避免无限循环
dhcp-match=set:ipxe,175

#两种模式传入对应的NBP路径
dhcp-boot=tag:bios,undionly.kpxe,netboot.lan,192.168.1.110
dhcp-boot=tag:efi-x86_64,ipxe.efi,netboot.lan,192.168.1.110
#向iPXE传入启动脚本路径
dhcp-boot=tag:ipxe,boot.ipxe,netboot.lan,192.168.1.110
这里提供DHCP的服务器与tftp不是同一个IP,如果使用同一个IP,只需要设置:
dhcp-boot=tag:bios,undionly.kpxe即可,后面的内容设置tftp服务器的hostname与
ip地址,默认为本机。
设置tftp Server 🔗
可以选择使用openwrt的dnsmasq提供的tftp server。
打开路由器管理界面luci,在“网络-DHCP/DHS-TFTP设置”中,
- 设置根目录为
/etc/tftp
openwrt系统不要设置到/var,这是个挂在到内存的目录,重启后消失。 - 设置网络启动镜像为
undionly.kpxe
这里可以设置任意值,会被上文中dnsmasq.conf的tag覆盖。填写内容防止luci的bug不开启tftp服务。
也可直接在/etc/dnsmasq.conf中添加:
enable-tftp
tftp-root=/etc/tftp
由于我的路由器固件空间不足,故我在一台Debian上另行设置了tftp server。
安装tftp服务
apt install tftpd-hpa
编辑tftp文件根目录
vim /etc/default/tftpd-hpa
重启tftp服务
systemctl enable tftpd-hpa.service
systemctl restart tftpd-hpa.service
准备tftp目录文件 🔗
tftp根目录(/etc/tftp)共有3个文件:
- undionly.kpxe
- ipxe.efi
boot.ipxe,内容为#!ipxe
#dhcp -c dhcp
chain –replace –autofree http://192.168.1.110/tftpboot/menu.ipxe ||
echo load menu failed
为了节约宝贵的路由器固件空间,菜单文件放在http server中。tftp速度非常慢,所以转移到ipxe支持的http协议中。
设置http server 🔗
安装nginx
apt install nginx
编辑配置文件
vim /etc/nginx/sites-enabled/default
在index index.html index.htm index.nginx-debian.html;下一行添加
location /tftpboot {
alias /path/to/your/wwwroot/ ;
}
重启服务
systemctl restart nginx.service
也可以不编辑配置,直接使用/var/www/html的根目录。
设置启动菜单 🔗
参考Extensive iPXE menu example,
设置menu.ipxe。
#!ipxe
# https://gist.github.com/robinsmidsrod/2234639
# Some menu defaults
set menu-timeout 20000
set submenu-timeout ${menu-timeout}
isset ${menu-default} || set menu-default exit
# Figure out if client is 64-bit capable
cpuid --ext 29 && set arch x64 || set arch x86
cpuid --ext 29 && set archl amd64 || set archl i386
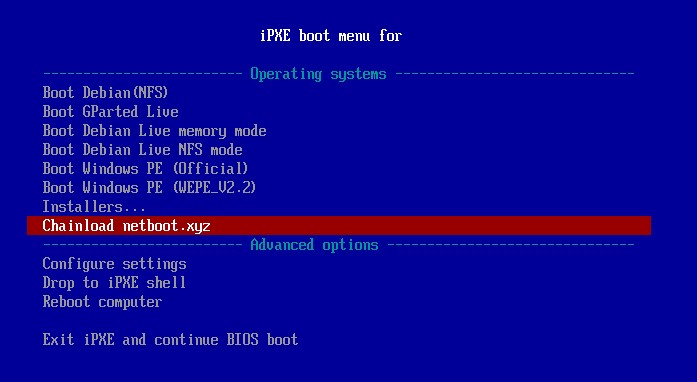
###################### MAIN MENU ####################################
:start
menu iPXE boot menu
item --gap -- ------------------------- Operating systems ------------------------------
item --key d debian Boot Debian(NFS)
item --key g gparted Boot GParted Live
item ldebian Boot Debian Live memory mode
item ldebiann Boot Debian Live NFS mode
item winpe Boot Windows PE (Official)
item --key w wepe Boot Windows PE (WEPE_V2.2)
item --key i menu-install Installers...
item --key n netbootxyz Chainload netboot.xyz
item --gap -- ------------------------- Advanced options -------------------------------
item --key c config Configure settings
item shell Drop to iPXE shell
item reboot Reboot computer
item
item --key x exit Exit iPXE and continue BIOS boot
choose --timeout ${menu-timeout} --default ${menu-default} selected || goto cancel
set menu-timeout 0
goto ${selected}
:cancel
echo You cancelled the menu, dropping you to a shell
:shell
echo Type 'exit' to get the back to the menu
shell
set menu-timeout 0
set submenu-timeout 0
goto start
:failed
echo Booting failed, dropping to shell
goto shell
:reboot
reboot
:exit
exit
:config
config
goto start
:back
set submenu-timeout 0
clear submenu-default
goto start
############ MAIN MENU ITEMS ############
:debian
echo Booting Debian in NFS
kernel rootfs/vmlinuz initrd=initrd.img ramdisk_size=14332 root=/dev/nfs nfsroot=192.168.1.110:/tftpboot/rootfs ip=dhcp rw
initrd rootfs/initrd.img
boot || goto failed
goto start
:gparted
echo Booting Gparted Live
kernel gpartedlive/vmlinuz initrd=initrd.img boot=live config components union=overlay username=user noswap noeject vga=788 fetch=http://192.168.1.110/tftpboot/gpartedlive/filesystem.squashfs
initrd gpartedlive/initrd.img
boot || goto failed
goto start
:ldebian
echo Booting Debian Live (copy to memory)
kernel debianlive/live/vmlinuz-5.10.0-10-amd64 initrd=initrd.img-5.10.0-10-amd64 boot=live components union=overlay username=user noswap noeject vga=788 fetch=http://192.168.1.110/tftpboot/debianlive/live/filesystem.squashfs
initrd debianlive/live/initrd.img-5.10.0-10-amd64
boot || goto failed
goto start
:ldebiann
echo Booting Debian Live (NFS)
kernel debianlive/live/vmlinuz-5.10.0-10-amd64 initrd=initrd.img-5.10.0-10-amd64 boot=live components username=user noswap noeject vga=788 nfsroot=192.168.1.110:/tftpboot/debianlive ro netboot=nfs
initrd debianlive/live/initrd.img-5.10.0-10-amd64
boot || goto failed
goto start
:winpe
echo Booting Windows PE
kernel wimboot
initrd winpe/BCD BCD
initrd winpe/boot.sdi boot.sdi
initrd winpe/boot.wim boot.wim
boot || goto failed
goto start
:wepe
echo Booting Windows PE
iseq ${platform} efi && goto wepe_efi || goto wepe_bios
:wepe_efi
sanboot winpe/WePE64_V2.2.iso || goto failed
goto start
:wepe_bios
initrd winpe/WePE64_V2.2.iso
chain memdisk iso raw || goto failed
goto start
:netbootxyz
echo Chainload www.netboot.xyz
#iseq ${platform} efi && chain netboot.xyz.lkrn || chain netboot.xyz.efi
chain --replace --autofree http://boot.netboot.xyz/ || goto failed
goto start
############################ INSTALLER MENU #########################
:menu-install
menu Installers for ${initiator-iqn}
item debian-netinstall Install Debian Netinit
item --key 0x08 back Back to top menu...
iseq ${menu-default} menu-install && isset ${submenu-default} && goto menu-install-timed ||
choose selected && goto ${selected} || goto start
:menu-install-timed
choose --timeout ${submenu-timeout} --default ${submenu-default} selected && goto ${selected} || goto start
:debian-netinstall
echo Booting Debian Netinit Installer
kernel http://mirrors.ustc.edu.cn/debian/dists/stable/main/installer-amd64/current/images/netboot/debian-installer/amd64/linux
initrd http://mirrors.ustc.edu.cn/debian/dists/stable/main/installer-amd64/current/images/netboot/debian-installer/amd64/initrd.gz
imgargs linux vga=788 initrd=initrd.gz --- quiet
boot || goto failed
goto start
最终http服务器目录结构为:(我这里tftp和nginx的目录放在了一起,路由器仅提供DHCP服务)
\path\to\wwwroot\tftpboot\
├── boot.ipxe
├── ipxe.efi
├── memdisk
├── menu.ipxe
├── undionly.kpxe
├── wimboot
├── debianlive
│   ├── files extract from live iso
│   ├── dists
│   ├── EFI
│   └── .......
├── gpartedlive
│   ├── filesystem.squashfs
│   ├── initrd.img
│   └── vmlinuz
├── rootfs
│   ├── files of a Debian Linux root
│   ├── boot
│   ├── dev
│   ├── etc
│   ├── home
│   └── .......
└── winpe
    ├── BCD
    ├── bootmgr
    ├── bootmgr.efi
    ├── boot.sdi
    ├── boot.wim
    └── WePE64_V2.2.iso
一些问题与相关文件下载 🔗
- Q: 文件下载
A: tftpboot.zip - Q: 怎么使用iPXE启动Linux?
A: linux启动方式类似于在grub中配置,加载内核,加载initrd内存盘,设置内核参数,启动kernel tftp://192.168.1.110/somepath/vmlinuz
initrd http://example.org/initrd.gz
imgargs vmlinuz vga=788 initrd=initrd.gz — quiet
boot - Q: 怎么启动winPE
A: 有两种方式,一种利用iPXE的wimboot,不过我们常见的PE系统都精简了PXE组件,使用wimboot对这类pe的兼容性不佳;另一种是启动封装好PE的ISO - Q: 怎么启动ISO
A: UEFI模式直接使用sanboot,Bios模式使用pxelinux的memdisk。memdisk还可以启动dos系统等。参考上文menu.ipxe中启动WEPE.iso的条目。 - Q: memdisk获取
A: 下载syslinux.zip中的\bios\memdisk\memdisk - Q: chainload netboot.xyz失败
A: iPXE的IPv6设置有问题,似乎不支持SLAAC,不设置默认网关,选用了netboot.xyz的IPv6地址导致联网失败。自行编译iPXE并不启用IPv6即可;或启动时按住m,手动设置IP则不会设置IPv6。 - Q: 想要进一步设置windows无盘系统? A: 你需要iSCSI服务器。